Growing seeds is a great project for a stretch of time at home. Spring is the perfect time for this activity because it allows children to see up close the life cycle that is taking place every day outside our windows.
Growing seeds can be as simple, or as complicated, as you’re up for. We’re going simple, but feel free to make it more elaborate.
- Find some seeds from last year’s garden or in your kitchen cupboard. Large beans are nice because you can see more of their development. Some suggestions:
- Beans
- Sunflower seeds
- Peas
- Pumpkin/squash
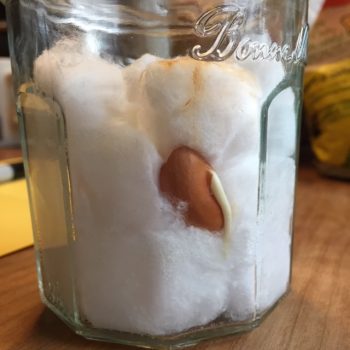
- Find a container. A clear glass jar (e.g. jelly jar, small mason jar) is ideal because you can see the roots develop. You can also use egg cartons or any small container.
- Soak seeds for 6 – 24 hours. (Or, do an experiment and soak some seeds but not the others. Be sure to label them accordingly!)
- Rinse the seeds after soaking.
- Wet some cotton balls so they are moist but not saturated and put them in the jar. You only need an inch or two of cotton balls in the bottom of the jar. They’re there to hold moisture.
- Wedge the bean between the glass and the cotton balls, so you can watch it change.
- Watch and wait! Keep the cotton balls damp, but not too wet. A sprinkle of drops every couple of days is usually enough initially. (Beans rot if they get too wet.)
While you wait…
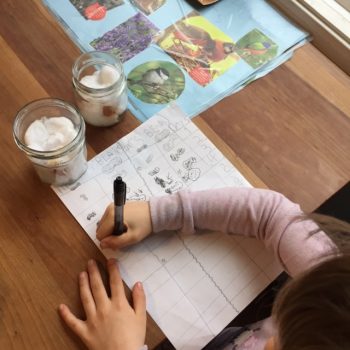
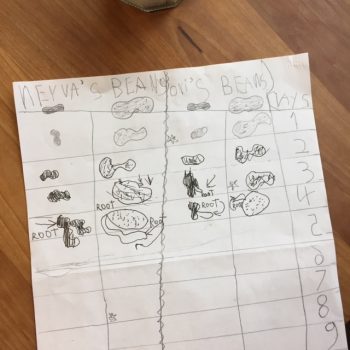
- Make a chart to track the beans growth. On a sheet of paper, have your child make a column for each bean growing. Divide the columns with lines for each day of growth.
- Ask your kiddos to predict (make a hypothesis) what day they think the bean will start to pop out a tap root, or other growth points (stem, cotyledon, first true leaves, etc). This makes them even more of a scientist!
- Each morning, look at your bean. Have your child draw a picture of its growth! Older children can make more detailed notes.
Every day usually brings big changes! … There will be lots of “WOAH! Look!!!”
 When the beans get bigger, transfer them into a larger container. You can use large 28 oz tomato cans with soil until they can be planted in the ground. It’s best to poke some drainage holes in the bottom to keep them from getting too wet.
Once the true leaves develop, the plant will needs lots of light, so put it in a south-facing window if you have one. Plants get leggy when they don’t have enough direct light.
CREA’s Summer Camp Director is growing beans with her daughters. See pictures below to see Neyva and Oni’s beans and growth charts!
Full credit to Growing a Jeweled Rose website (https://www.growingajeweledrose.com/) for this method, with extra credit to Jenny for adding the plant growth chart.
If you have a printer at home, print out plant life cycle activity worksheets: https://superstarworksheets.com/science-worksheets/plant-life-cycle-worksheets/
Added bonus – this is a zero waste activity! Cotton balls are compostable, glass jar is re-usable, tomato can is re-purposed, beans are edible!